

WADER REPAIR INSTRUCTIONS
Home / My Account / Wader Repair Instructions
WADER REPAIR INSTRUCTIONS
Create backing with removable tape on the outside of waders
NEVER PUT WATER INSIDE OF YOUR WADERS. THE SEAMS ARE NOT MEANT TO WITH-STAND PRESSURE FROM THE INSIDE. FILL WITH AIR IF YOU CAN AND THEN SEE WHERE THE AIR IS COMING OUT.
REPAIRING A WADER DOES VOID THE ONE YEAR WARRANTY.
WE RECOMMEND AQUALSEAL AS A GLUE.
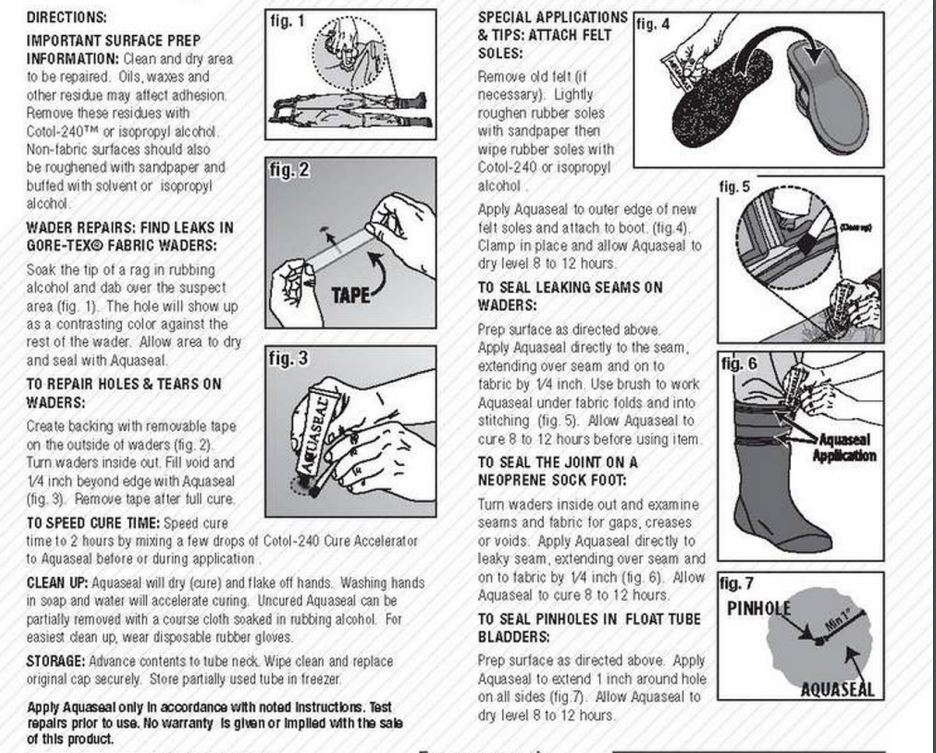
ADHESIVE PATCHING:
1. Create backing with removable tape on the outside of waders in the troubled area. Turn waders inside out
2. Clean and dry area to be repaired. Oil, waxes and other residue may affect adhesion. Remove these residues with isopropyl alcohol if needed. Isopropyl has also been know to show you where the pin holes are. ONLY ON THE INSIDE. Wipe the isopropyl alcohol on and the holes will show up in darker color
3. Apply adhesive directly to the seam or tear and spread ¼ inch beyond edge. Use brush (or popsicle stick if adhesive is too thick) to work adhesive under fabric folds and into stitching if necessary. Keep adhesive as smooth as possible, apply a piece of packing tape directly over area to keep smooth and flat. Let cure 24 hours
4. For extra protection, turn waders right side out and repeat all of step 3 on the outside of waders.
5. Remove all packing tape.
6. If the area is more than a pin hole then make a fabric patch and see below
FABRIC PATCHING:
1. Cut fabric patch to cover area needed. and 1 more. Put adhesive in the hole and also spread adhesive along back edge of patch and place patch onto the waders. Cover with packing tape and let cure for 24 hours.
2. For extra protection, turn waders inside out and repeat all of step 1 on the inside of waders
3. Remove all packing tape.
4. Additionally you can cut seam tape to fit around edge of patch. Heat iron to Medium or High setting, depending on your iron.
5. Place a piece of paper on the inside of waders in the area you’re working on to avoid gluing the leg together.
6. Carefully place seam tape over edge of patch. Try to center the seam tape over the edge of the patch. Cover with ironing cloth provided. Using the tip of the iron, heat the seam tape until it sticks (keep carefully checking). Avoid too much movement of the seam tape while it’s still warm which can cause it to lift. Seal all edges of the patch with the seam tape. Let cool
7. If necessary, turn waders inside out and repeat step 6
NEOPRENE:
First, try and make sure the area around the hole is as free from dirt and debris as possible.
Next we would put a little bit of adhesive in the hole to try and glue the neoprene fabric pieces back in place. Put a piece of wide packing tape behind the hole (inside/outside and then brush on the adhesive (not too much) and then put another piece of tape on the glue side. Let that cure for 24 hours. The tape will stop it from being lumpy. You need a flat surface for the next step.
Take off both pieces of tape
Cut ample sizes of pieces of the patching tape to put over the hole. You can put two pieces side by side if needed to sufficiently cover the hole. The patches are iron-on patches but always keep a thin towel in between the iron and the wader. Put the iron on medium high heat and press on the towel over the patch. Slowly lift the towel and make sure the patch is sticking. Repeat this process on the other side of the wader.
Wait another 24 hours before use